File locking has a long tradition in computing: you or independently running software wants to make sure that a file isn’t modified or deleted when it’s needed or in use. Because macOS is Unix based, it offers file-level permissions flags that control how a file can be manipulated and by whom.
But macOS has long had a separate way to lock a file from the Finder that also prevents it from being modified, deleted, or rename from the Terminal or other apps. Lock, unlock, and status commands are also available via the command line in Terminal.
(Note that Finder-oriented locking is entirely different from setting a file to read-only permission either in the Finder or via the Terminal, which involves changing Unix permissions. I recommend not using read-only status for files and folder you work with in the Finder and via apps, as the Finder doesn’t honor those permissions for files that are assigned to you in macOS via Unix permissions, which typically includes everything in your home directory.)
Lock and unlock via the Finder in macOS Big Sur
Turning the lock on and off in the Finder is incredibly simple. Select one file or folder and choose File > Get Info; or select multiple files or folders and hold down Option while choosing File > Show Inpector—the Option key opens a single Get Info window for the multiple items called Multiple Items Info. A Locked checkbox can be selected or deselected. It shows a – (dash) if the items selected are in a mixed state of being locked and unlocked; clicking will lock all the files.
macOS used to show an overlaid lock icon as at left in Mojave; in Big Sur, at right, it no longer provides this indicator in the Finder.
Prior to Big Sur, locked files would have a lock image overlaid on its icon in the Finder. Big Sur only shows that lock overlay in the Get Info dialog box.
 IDG
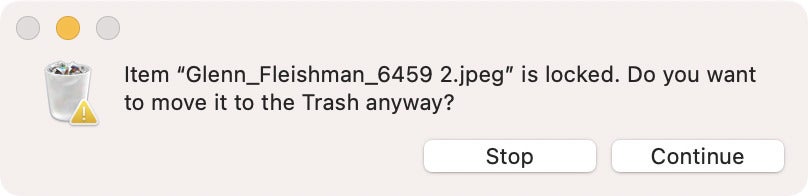
IDGBig Sur prompts you to confirm removing a locked file.
Once the file is locked, it can be moved around in the Finder, but not renamed or modified via apps. It can be deleted, but only if you confirm the operation.
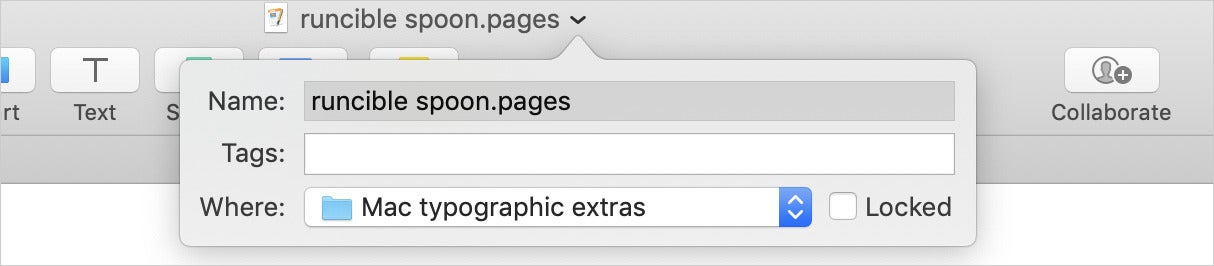
Apple’s apps and those of third parties that support the convention also let you lock and unlock documents from the titlebar: click the downward-pointing arrow to the right of the file name and then select or deselect the Locked checkbox.
 IDG
IDGPages and other apps let you lock and unlock documents from the titlebar.
Using the Terminal
If you like to poke at macOS’s internals via Terminal, launch Applications > Utilities > Terminal and navigate to a folder that you’ve locked an item in. If your file is on the Desktop, you can type this to get there:
cd ~/Desktop
macOS reveals the lock status with a special flag on the Unix file-listing command, ls. Enter this:
ls -lO front_door.jpeg
(That’s a capital letter O there.) You can replace front_door.jpeg with * to list everything in the directory, use another specific filename or enter a wildcard pattern, like license*, which matches all files and folders starting with “license�. The same is true for the file name example in all the below cases.
Terminal will show you the term uchg as a “flag� for any locked file, as in:
-rw-r--r--@ 1 gif staff uchg 150293 Mar 8 2020 front_door.jpeg
To lock and unlock a file in the Finder, you can directly modify that uchg flag:
- To lock a file:
chflags uchg front_door.jpeg - To unlock a file:
chflags nouchg front_door.jpeg
If you want yet another method, you can use SetFile, which lets you change attributes on a file:
- To lock a file:
SetFile -a L front_door.jpeg(capital L) - To unlock a file:
SetFile -a l front_door.jpeg(lowercase l)
This Mac 911 article is in response to a question submitted by Macworld reader Beverly.
Ask Mac 911
We’ve compiled a list of the questions we get asked most frequently along with answers and links to columns: read our super FAQ to see if your question is covered. If not, we’re always looking for new problems to solve! Email yours to [email protected] including screen captures as appropriate, and whether you want your full name used. Not every question will be answered, we don’t reply to email, and we cannot provide direct troubleshooting advice.
The post How to lock files in macOS Big Sur’s Finder appeared first on TechFans.